Virtual appliance installation
Avalon provides a pre-packaged Virtual Machine, ready to import on your hypervisor. The image is approximately 3.3 GB (version 1.3, September 2026).
How you get the image
The appliance image reaches you through a personal download link, emailed to you when your request is approved.
Have not requested one yet? The form is on www.avalon-nap.com, under Try Avalon.
Avalon Manager updates and Avalon releases are then available from the customer portal, where your license acts as the credential: there is no account and no password to manage.
Virtual Machine
The Virtual Machine mode, where you provide the VM yourself, is offered on request only. The virtual appliance described below is the standard deployment, and the only one documented here.
If your environment cannot host the appliance, contact the Avalon team: we will look at the constraint with you and decide together how to proceed.
Virtual Appliance
Specifications
Our current (1.3) VA has the following specifications:
- 4 vCPUs
- 8 GB of RAM
- Disks:
- System disk: 40 GB
- Application disk: 120 GB
- 3 Network cards
- A CPU exposing the AVX2 instruction set (Haswell generation or newer)
Note
This sizing has been proven on a 1,000-device estate, with an optimal user experience.
CPU instruction set
Avalon requires AVX2. Several hypervisors present their virtual machines with a deliberately conservative CPU model by default, chosen to allow migration between heterogeneous hosts, and it does not expose AVX2.
The symptom is misleading: the appliance boots normally and Avalon Manager answers, but Avalon does not start.
In the virtual machine's settings, check that the CPU model presented to it exposes AVX2.
Procedure
Import the VA via your hypervisor
The appliance ships as an OVA.
User action required
Follow your hypervisor's documentation to import the OVA, then check the CPU model presented to the virtual machine (see the specifications above).
VMware vSphere
Validated on vSphere 6.7. The archive deploys as it is through the Deploy OVF Template wizard: CPUs, memory, disks and network interfaces are all derived from it.
Warning
If your cluster uses EVC (Enhanced vMotion Compatibility), check that the chosen baseline is not older than Haswell.
EVC aligns processors on a common denominator to allow live migration: a baseline that is too old masks AVX2 from the virtual machines.
Proxmox VE
Validated on Proxmox VE 9.2. The web interface's import wizard takes the archive as it is: the disks, the three network interfaces, the boot order and the guest OS type are all derived from it. Three settings remain yours to make.
Before the import: the storage holding the archive also serves as its working space, and must therefore allow both the Import and Disk image content types. Otherwise the import is refused.
During the import: switch the disk destination to an local-lvm storage. The wizard defaults to the archive's own storage, which would place the appliance's disks on the node's filesystem.
Before the first boot: correct the CPU type, which the import leaves on the default x86-64-v2-AES model, without AVX2:
Hardware → Processors → Type → x86-64-v3, or host on a standalone node.
Hyper-V
Hyper-V does not consume the OVA format. Contact the Avalon team, who will advise on the approach for your environment.
Connect to the appliance through KVM
Use your hypervisor’s KVM to access the VA's console.
Mandatory input
login: avalon-user
password: avalon
Change this password
avalon is the default password, the same on every appliance and published in this documentation. Unlike the Avalon administrator account, nothing forces you to change it: no one will do it for you.
The passwd command in the Avalon Shell menu does it, right after your first login.
You should see the Avalon logo, the initialization script starts right after login:
avalon-user@------'s password:


                      %=                      %%%%%%
                    %%%===                    %%%%%%
                  %%%%%=====                 %%%%%%%%   %%%%%   %%%%%   %%%%%      %%%%        %%%%%%%%%    %%%%%   %%%%
                %%%%%%%=======              %%%% %%%%%   %%%%   %%%%   %%%%%%%     %%%%       %%%%%%%%%%%%  %%%%%%% %%%%
        %%     %%%%%%%  =======     ==     %%%%%  %%%%    %%%% %%%%%   %%%%%%%%    %%%%      %%%%     %%%%% %%%%%%%%%%%%
        %%%%%  %%%%%      =====  ====      %%%%%%%%%%%%   %%%%%%%%%   %%%%  %%%%   %%%%     %%%%%      %%%% %%%%%%%%%%%%
         %%%%%%%%%%%      ===========     %%%%%%%%%%%%%%   %%%%%%%   %%%%%%%%%%%   %%%%      %%%%     %%%%% %%%% %%%%%%%
          %%%%%%%%%%      ==========     %%%%       %%%%   %%%%%%%   %%%%%%%%%%%%  %%%%%%%%%  %%%%%%%%%%%%  %%%%  %%%%%%
           %%%%%%%%%      =========     %%%%%        %%%%   %%%%%   %%%%     %%%%  %%%%%%%%%   %%%%%%%%%    %%%%   %%%%%

Last login: -

╔══════════════════════════════════════════════════════╗
║              AVALON CONFIGURATION SETUP              ║
╚══════════════════════════════════════════════════════╝
Initial configuration detected.
❖ Enter the FQDN [localhost]:
Initialization script
Introduction
The initialization script is a text-based application that will allow you to configure and edit the appliance settings:
- Define the appliance FQDN
- Configure the subnet used internally by Avalon App containers
- Configure the appliance network interfaces (VA mode only)
- Configure additional network services such as DNS and NTP
Note
At the end of the first configuration, Avalon Manager will automatically be started.
Check the Avalon overview section if you don't know yet what Avalon Manager is.
Configuration workflow
Here under is the step by step workflow to configure your Virtual Appliance.
╔══════════════════════════════════════════════════════╗
║              AVALON CONFIGURATION SETUP              ║
╚══════════════════════════════════════════════════════╝
Initial configuration detected.
❖ Enter the FQDN [localhost]:
Note
You must define a FQDN, if one is already configured then just press enter to use it, otherwise type in the FQDN for the VA.
This FQDN should resolve to the IP address that you will configure for the VA.
Next, you will set up the containers’ internal network.
This network should use a /27 subnet. You do not need to specify the subnet mask.
A default gateway is required to allow communication with your network.
The script will ensure that the gateway belongs to the subnet.
All traffic entering or leaving the containers’ internal network will pass through the Virtual Appliance’s NAT process. The source IP will be the one assigned to the VA interface connected to the default gateway.
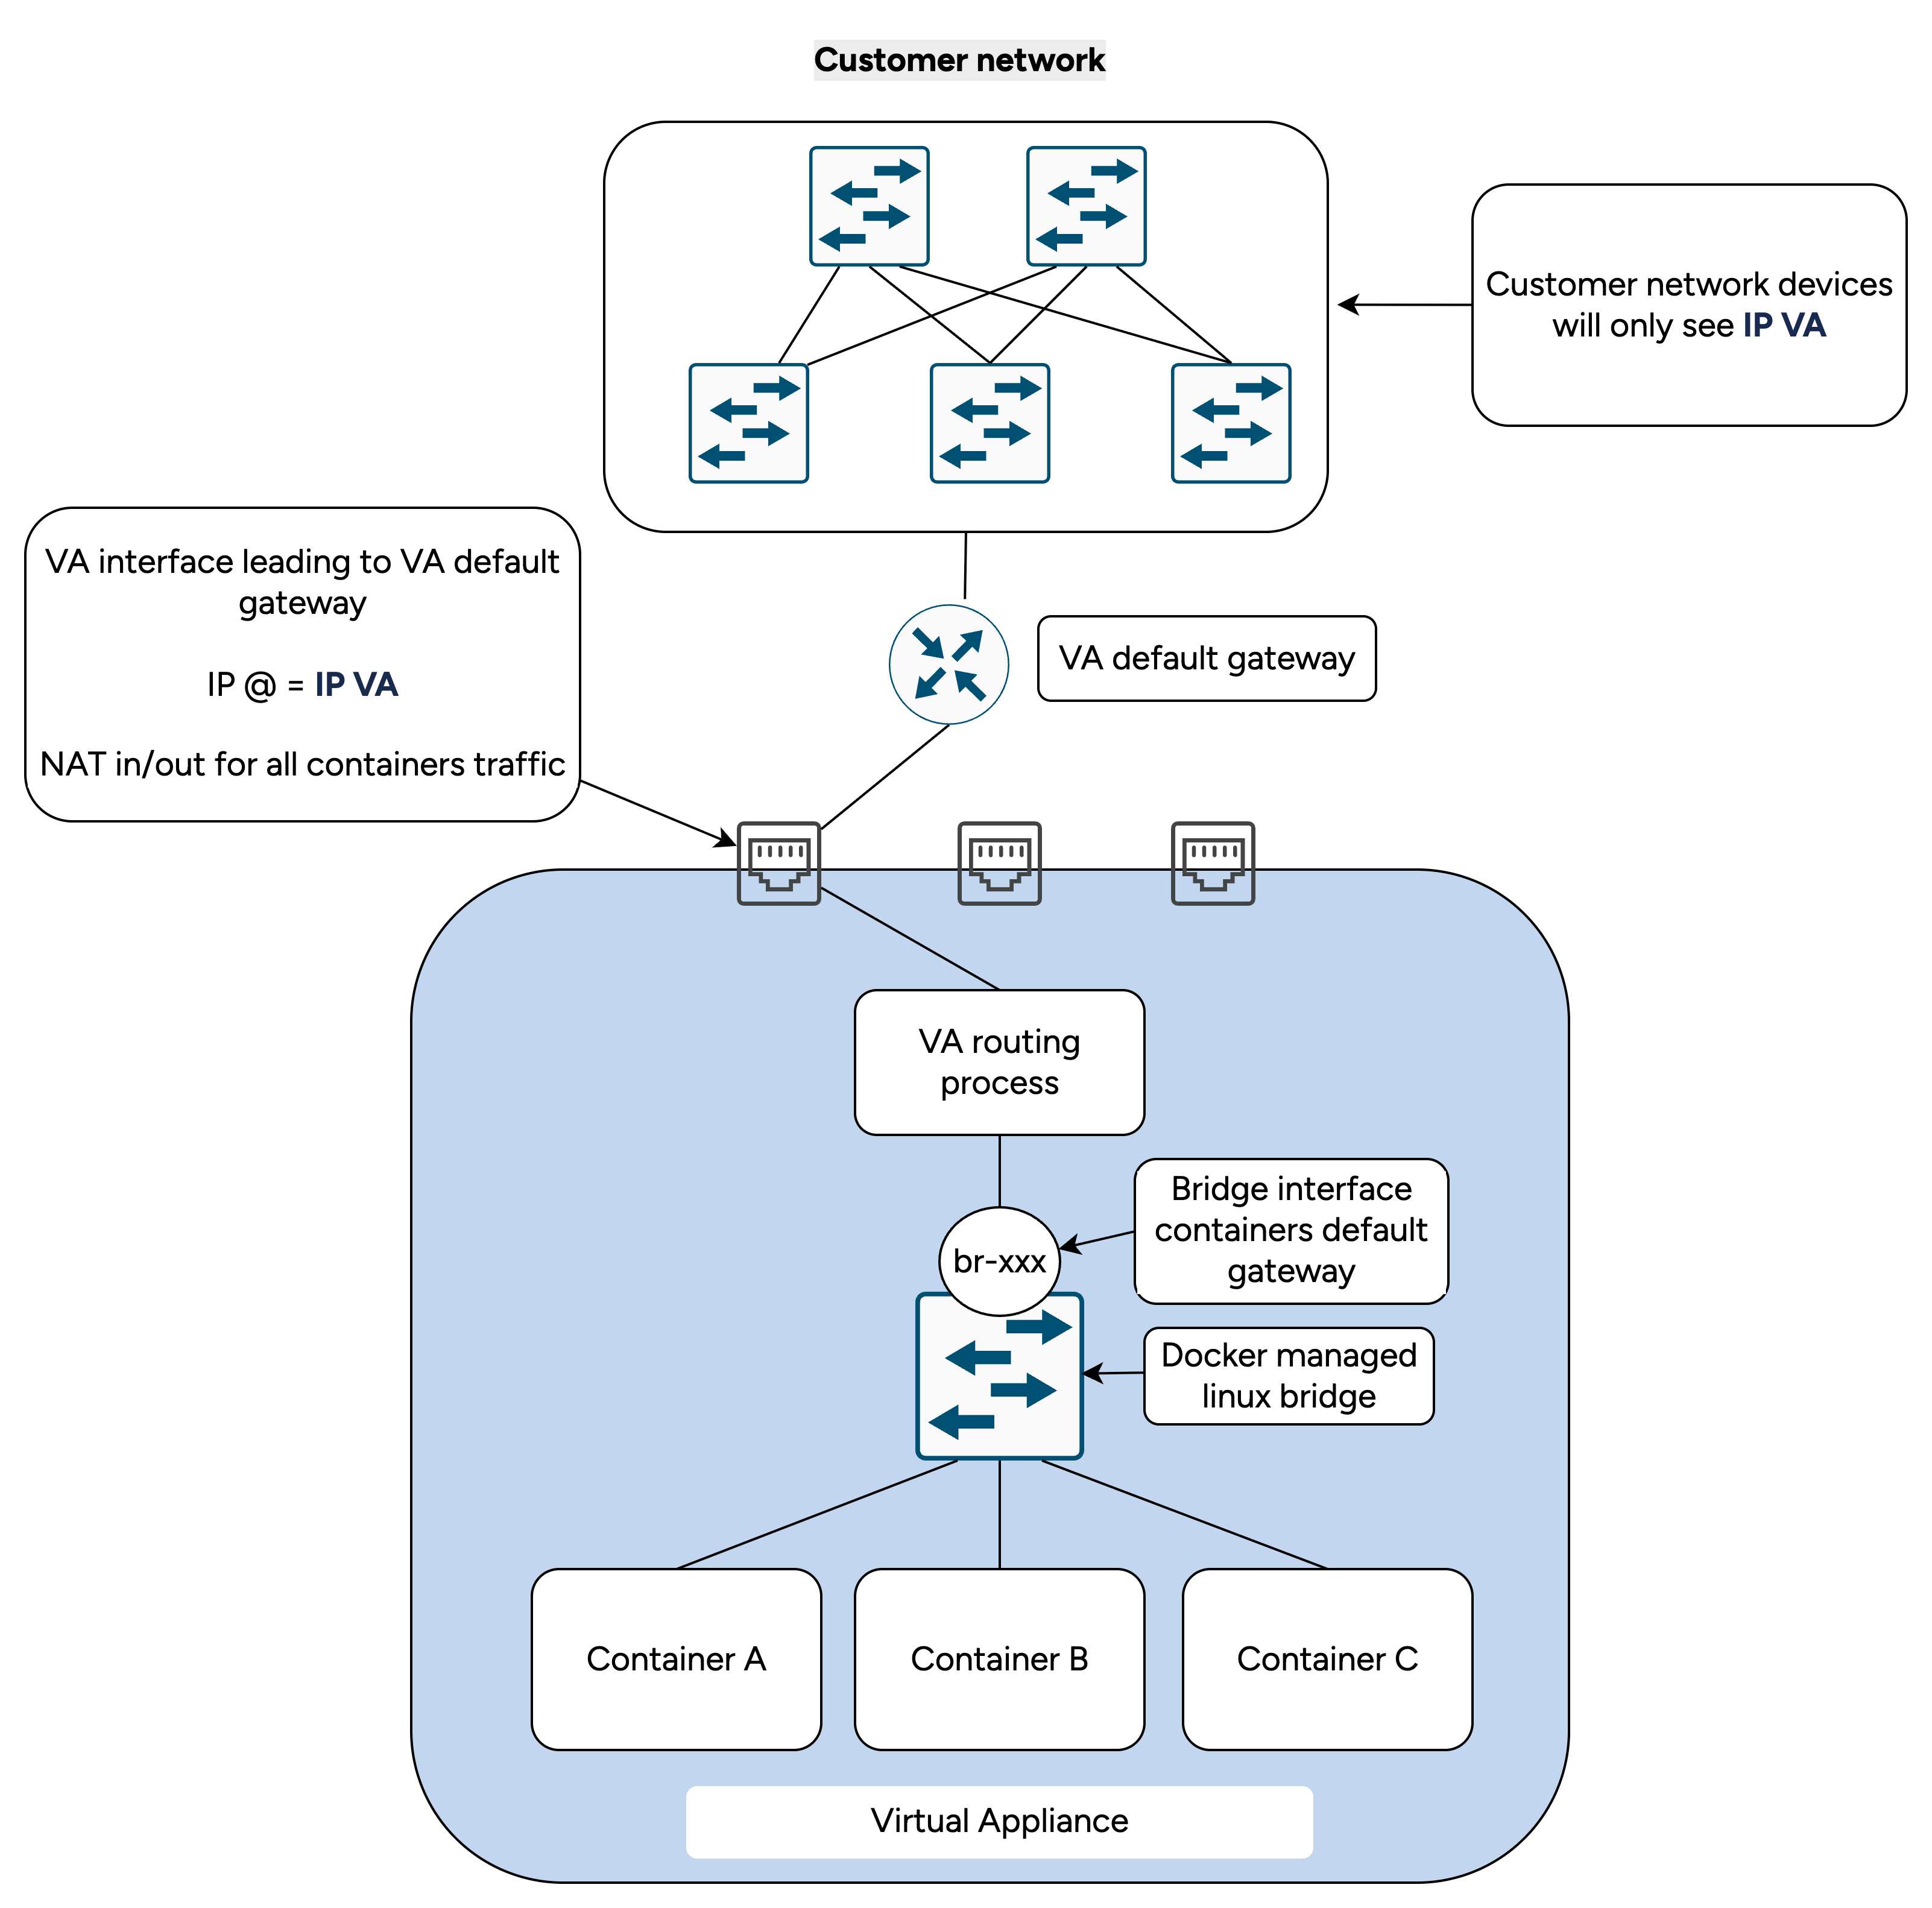
Note
This network has not to be accessible from the rest of your network as it will not be used to access your devices or servers.
Default docker bridge running the 172.17.0.0/16 subnet is disabled.
✅ FQDN set to: va1.avalon-nap.com
❖ Enter a /27 subnet for the application internal network: 172.16.0.0
✅ SUBNET set to: 172.16.0.0/27
❖ Enter the gateway IP: 172.16.0.30
✅ Gateway set to: 172.16.0.30
You will then be asked to configure the VA network. You can configure more interfaces later as well as static routes. In this example, we will configure a single interface and a default gateway.
Danger
You won't be able to change the production interface once selected!
--- Available Interfaces ---
[1] enp0s3 - MAC: 08:00:00:00:00:01 - IP: None
[2] enp0s8 - MAC: 08:00:00:00:00:02 - IP: None
[3] enp0s9 - MAC: 08:00:00:00:00:03 - IP: None
❖ --- Production interface selection ---
You won't be able to modify the production interface after initial configuration.
Select the production interface: 1
❖ Configuring interface: enp0s3
❖ Enter IP/mask: : 192.168.110.1/24
✅ Static IP set to: 192.168.110.1/24
❖ Enter the gateway IP (or leave empty for no gateway): 192.168.110.254
✅ Gateway set to: 192.168.110.254
Next you will be asked to define DNS and NTP servers.
If you want to be able to update Avalon through our servers, you are required to define a DNS server.
Defining a NTP server is also highly recommended but a default server will be used if you leave it blank.
❖ Do you want to add a DNS server? Y/n: Y
❖ Enter DNS server IP: 8.8.8.8
✅ DNS server added: 8.8.8.8
❖ Do you want to add a DNS server? Y/n: n
✅ Interface enp0s3 updated
Applying network changes...
Network configuration applied successfully.
❖ Enter a NTP server FQDN (optional, leave blank for default NTP server):
Configuration complete.
Now the configuration is complete and you will see the status of the VA:
- Avalon Manager status
- Avalon volume status
- Docker process status
- Avalon's configuration (FQDN + containers' subnet)
=== Avalon Appliance Status ===
INSTALLATION_MODE: va

Services:
  Avalon Manager: active, available at https://va1.avalon-nap.com:8443
  Avalon volume: mounted
  Docker: active

=== Application configuration ===
  FQDN: va1.avalon-nap.com
  SUBNET: 172.16.0.0/27
  GATEWAY: 172.16.0.30
Right after the status, you will see the Avalon Shell prompt.
[Avalon Shell]#
Avalon Shell
Avalon Shell is a restricted shell that will only allow avalon-user to take four actions:
- change its password
- display the VA status
- run the configuration script again
- reboot the VA
Note
Completion is disabled in Avalon Shell
You can use ? or help to display the available commands:
[Avalon Shell]# ?

═══════════════════════════════════════════════
        Welcome to the Avalon Shell
═══════════════════════════════════════════════
[?] or [help]         Show this help message
[avalonconfig]        Run Avalon configuration
[avalonstatus]        Display Avalon status
[passwd]              Change your password
[reboot]              Reboot the server
[exit]                Exit the shell
═══════════════════════════════════════════════

[Avalon Shell]#
You can run the configuration script, which will display different options depending on what you want to modify and the installation mode.
The passwd command refers to the standard Linux password command.
Configure Avalon Manager
Now that your VA is ready to use, it is time to configure Avalon Manager. The URL will be displayed at the end of the initial configuration and can also be shown again using the avalonstatus command.